Advanced Cluster Security (ACS) 5
Feature Overview
Red Hat Advanced Cluster Security (ACS) 5 introduces several new capabilities for securing containerized and virtualized workloads:
-
VM Vulnerability Management — extends RHACS vulnerability scanning to cover virtual machine workloads running on OpenShift Virtualization. The
roxagentservice runs inside VMs, scans installed packages (RPM/DNF), and reports vulnerabilities to ACS Central via Sensor over VSOCK with pull mode. Organizations gain unified vulnerability visibility across both containers and VMs from a single ACS console. -
File Activity Monitoring (FAM) — provides runtime file integrity monitoring. Security teams can define custom file paths, with wildcard support, to monitor for access, modification, and rename operations. File activity criteria can be combined with process-level criteria such as process name, ancestor, arguments, UID in deployment and node policies, enabling detection of unauthorized file access patterns required for compliance frameworks such as PCI-DSS.
-
ACS MCP Server — exposes ACS Vulnerability Management APIs (CVEs, images, deployments, and nodes) and Configuration Management APIs (secured clusters) as MCP tools, allowing AI agents to query security data programmatically.
-
Init Container Security Coverage — RHACS now evaluates init containers for both image scanning and security policies. When a deployment references init containers, their images are scanned for vulnerabilities using the same process as main container images. Build and Deploy stage policies can be configured to include or exclude init containers using the "Filters" menu.
Each of these features is covered in more detail in the following sections. Part of each walkthrough will be to discuss how the feature is setup, how it works, and how it can be used to secure your environment.
Before You Begin
-
Confirm you can open the OpenShift console and ACS Central tabs in the Showroom UI. Log in with the credentials on the Welcome page:
Service Username Link OpenShift Console
{openshift_cluster_admin_username}{openshift_cluster_console_url}[Console^]
ACS Central
admin -
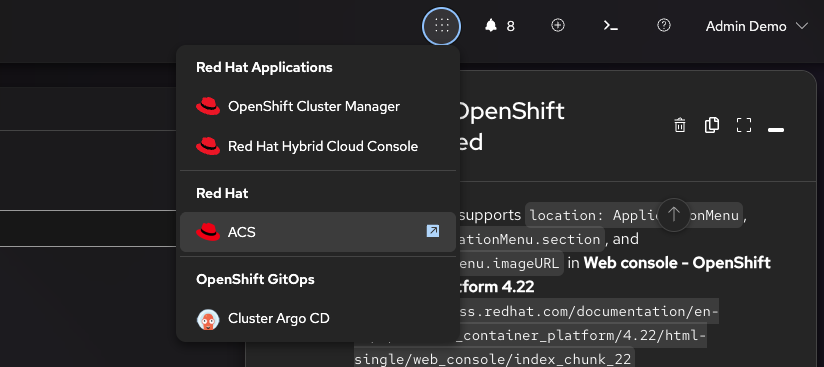
In the OpenShift Console, open the OpenShift Lightspeed dialog (the icon at the bottom right of the interface). Ask Lightspeed to create a shortcut to the ACS console:
can you create a global consolelink that has the label 'ACS' and points to the route for the ACS console. Add the Red Hat icon to the consolelinkOnce it is completed, click on the 3x3 icon at the top; you should see this:
-
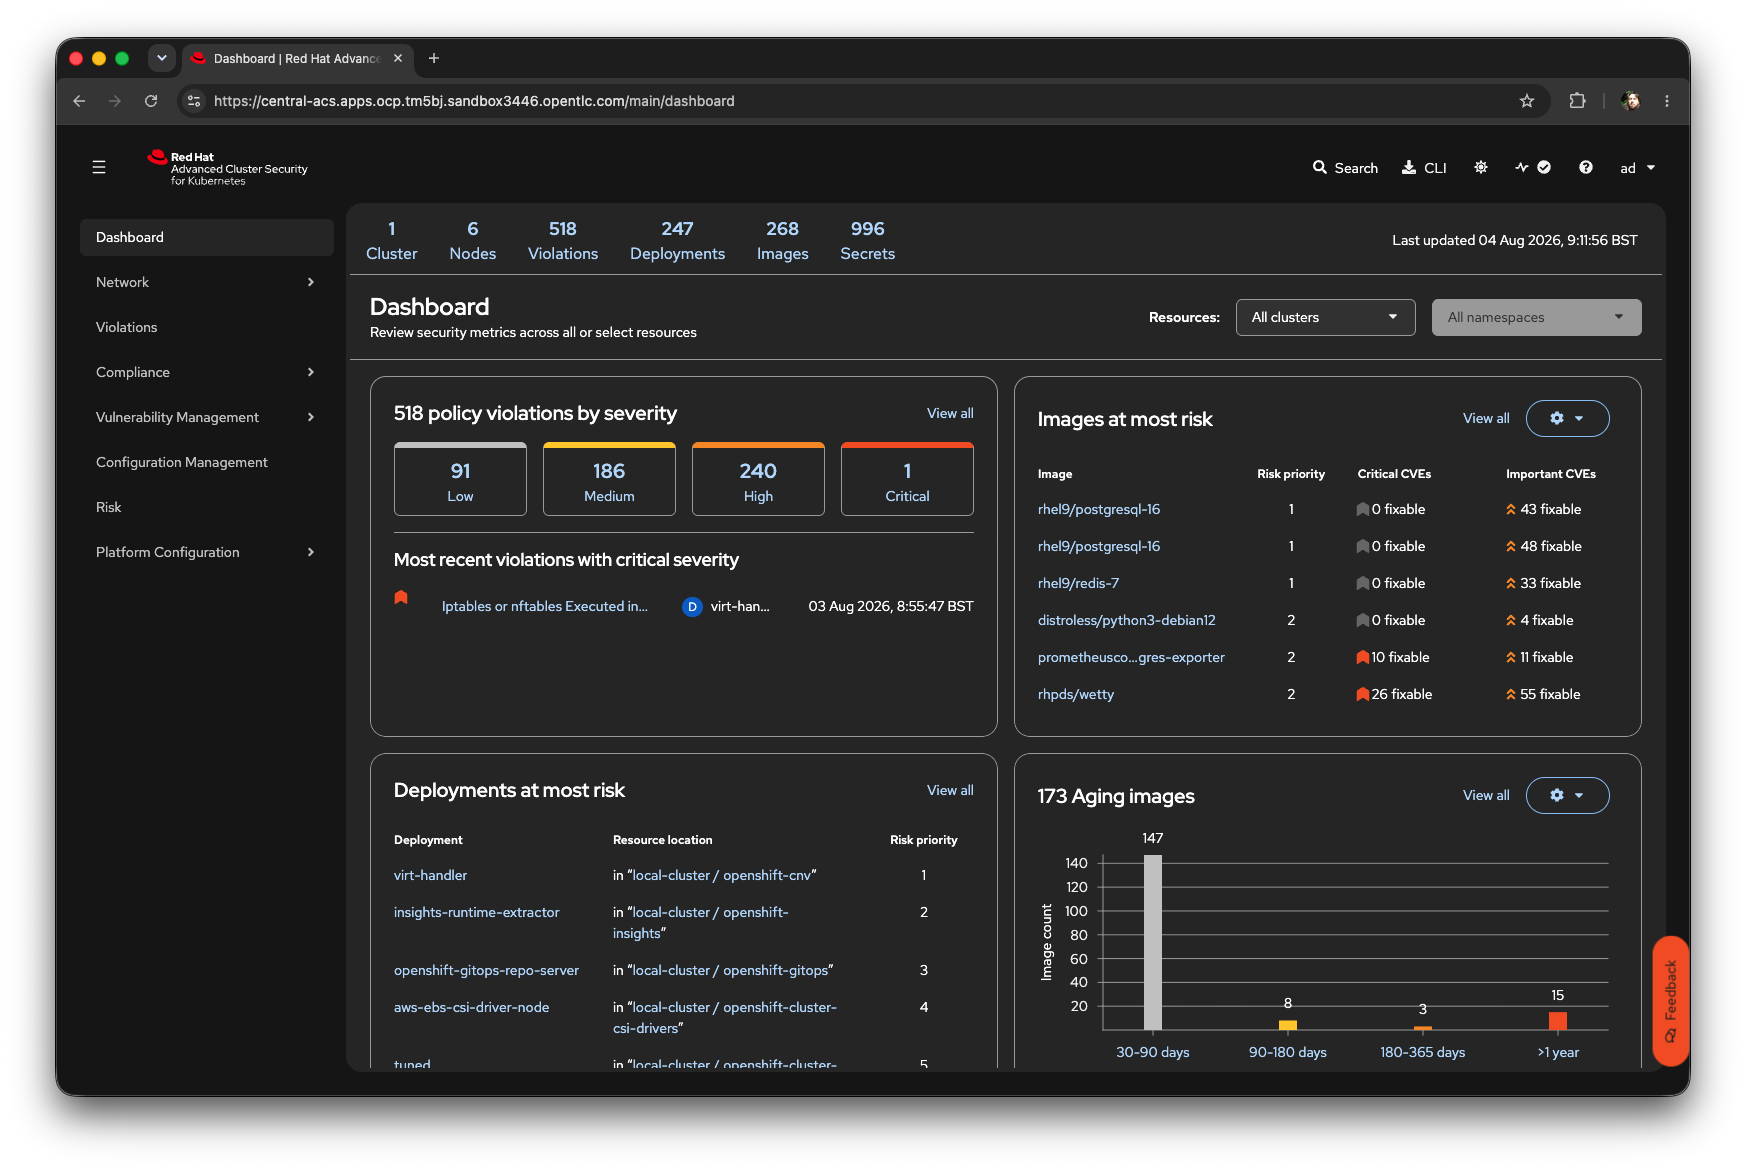
Log into the ACS console by clicking the 'ACS' link you just created, using the credentials above. You can also click the "Red Hat Advanced Cluster Security" tab at the right to open the ACS console.
-
Verify the Secured Cluster is connected: navigate to Platform Configuration > Clusters in ACS Central and confirm the Secured Cluster is listed.
-
Verify the prebuilt VM is running:
oc get vmi -n rhacs-virtYou should see
rhel9-vmin aRunningphase. -
Deploy the RHACS / OpenShift Security Roadshow demo applications.
These are intentionally vulnerable workloads and are not recommended for production environments. cd ~/ && git clone https://github.com/mfosterrox/demo-applications.git cd ~/demo-applications oc apply -f k8s-deployment-manifests/-namespaces/ oc apply -R -f k8s-deployment-manifests/log4shell/ oc apply -R -f k8s-deployment-manifests/webgoat/ oc apply -R -f k8s-deployment-manifests/dvwa/ oc apply -R -f k8s-deployment-manifests/acs-fam-demo/Confirm the File Activity Monitoring (FAM) trigger is running:
oc get deploy,pods -n acs-fam-demoYou should see
fam-targetin aRunningphase. -
Verify the ACS MCP server is available:
oc get pods -n rhacs-mcp
oc get route -n rhacs-mcp
Output should look like this:
oc get route -n rhacs-mcp
NAME                                          READY   STATUS      RESTARTS   AGE
acs-mcp-server-stackrox-mcp-b79597899-lz64s   1/1     Running     0          3h5m
copy-central-ca-8jrsn                         0/1     Completed   0          178m
NAME                          HOST/PORT                                                                    PATH   SERVICES                      PORT    TERMINATION          WILDCARD
acs-mcp-server-stackrox-mcp   acs-mcp-server-stackrox-mcp-rhacs-mcp.apps.ocp.2bfz7.sandbox5240.opentlc.com          acs-mcp-server-stackrox-mcp   https   reencrypt/Redirect   None
Awesome! You’re ready to start the exercises.
Hands-on Exercises
Exercise 1: VM Vulnerability Management
ACS 5 extends vulnerability scanning to virtual machines running on OpenShift Virtualization. A roxagent service inside the guest reports installed packages to Sensor over VSOCK, so you get unified CVE visibility across containers and VMs from a single ACS console.
In this exercise you will verify a prebuilt RHEL VM, review its findings in ACS, and optionally onboard a second VM.
Understanding the prerequisites for VM vulnerability scanning
Before you verify the prebuilt VM, review what RHACS requires to scan OpenShift Virtualization workloads. These conditions are already met in this lab for rhel9-vm.
For full product details, see the Scanning virtual machines topic in the RHACS 4.11 Operating guide.
How RHACS scans virtual machines
RHACS collects, processes, and analyzes VM package data with these components:
roxagent-
Quadlet (Podman container managed by systemd) that runs inside the VM. It scans installed packages, caches index reports, and runs in server mode to answer authenticated Sensor requests over VSOCK. In ACS 5.0, this is the supported customer-shipped form of
roxagent; standalone binaries are used only for local demos and are not shipped to customers. - Sensor
-
Cluster-level component that pulls index reports from
roxagentover VSOCK (via the KubeVirt API), aggregates VM data with Kubernetes API information, and sends it to Central. - Central
-
Stores VM information, matches packages against known CVEs (via Scanner V4), and exposes results in the RHACS portal and API.
Prerequisites
OpenShift Virtualization and RHACS must meet the following requirements in your environment:
| These requirements are met in this lab. |
-
The OpenShift Virtualization Operator is installed on the cluster you want to scan.
-
The
HyperConvergedresource is patched to enable virtual socket (vsock) support. -
The RHACS feature flag
ROX_VIRTUAL_MACHINES=trueis set on the Central container and the Sensor container. -
Sensor has RBAC permission to use VSOCK (
GETon thevirtualmachineinstances/vsockresource).
Each VM to be scanned must meet the following requirements:
-
The VM runs Red Hat Enterprise Linux (RHEL) and is registered with Red Hat Subscription Manager with an active RHEL subscription. VM vulnerability scanning does not cover non-RHEL guest operating systems in this release.
-
VSOCK is enabled on the VM with
spec.domain.devices.autoattachVSOCK: true. -
The VM has internet access to download repository-to-Common Platform Enumeration (CPE) mappings.
-
DNF is installed.
-
roxagentruns with privileges sufficient to scan package databases and expose index reports over VSOCK (typically root or sudo). -
At least one DNF transaction (for example,
dnf install) has been executed on the system to populate required metadata.
Verifying and reviewing the prebuilt VM in ACS
-
Confirm the prebuilt VM instance is running:
oc get vmi -n rhacs-virtOutput:
oc get vmi -n rhacs-virt
NAME       AGE     PHASE     IP            NODENAME
rhel9-vm   10m     Running   10.129.2.10   ip-10-0-161-177.ec2.internal
You should see rhel9-vm in a Running phase. You can also confirm in the OpenShift console under Virtualization > VirtualMachines.
-
In the OpenShift console, go to Virtualization > VirtualMachines and select the
rhacs-virtproject.Confirm that
rhel9-vmis listed and shows a Running status.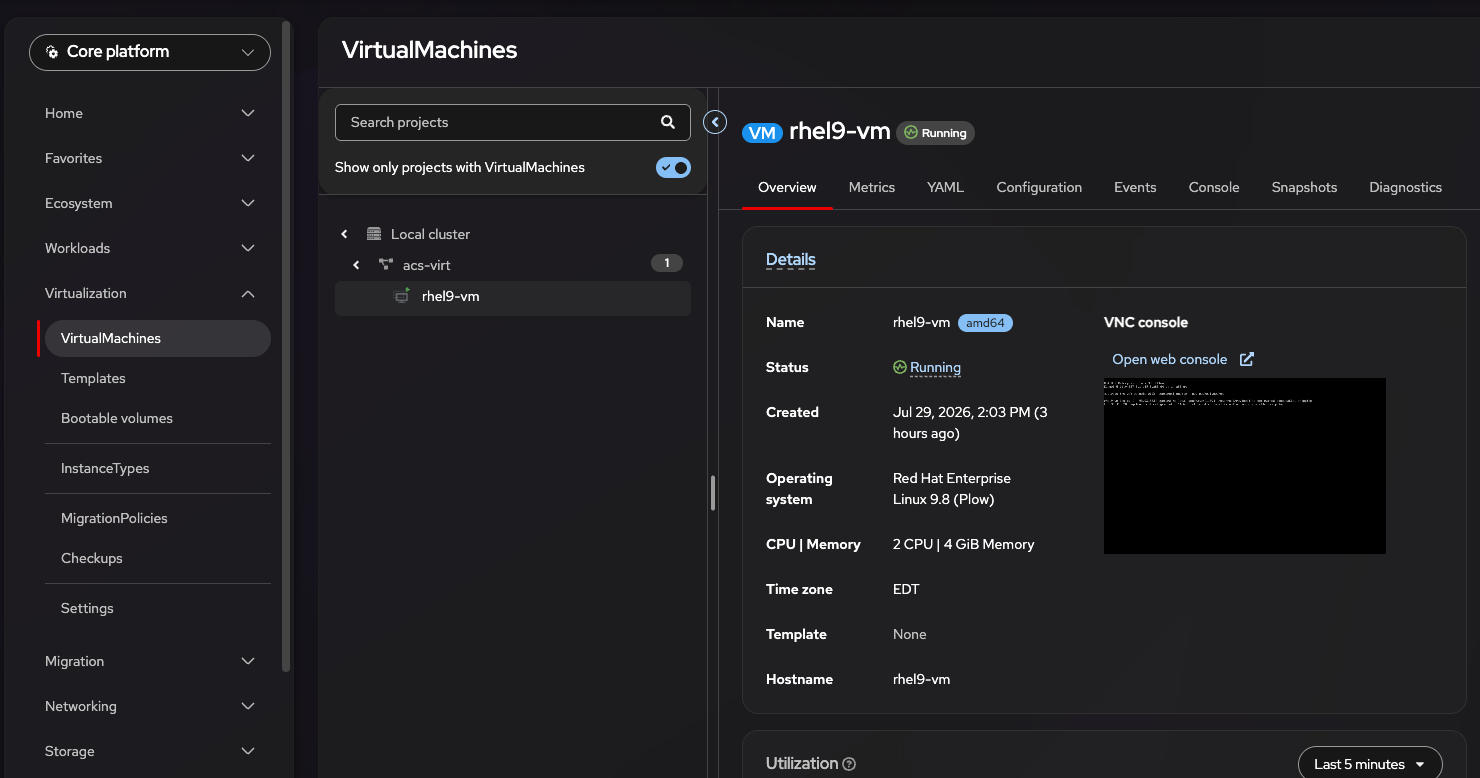
-
Open the web console for
rhel9-vmand log in:On the
rhel9-vmoverview, use Open web console (or open the Console tab).Log in with username
cloud-userand the VM password from the Welcome page.Run the remaining guest commands in this procedure from the VM console, not from the Showroom terminal.
-
Verify that
roxagentis installed and healthy inside the VM. Run these from the VM console:command -v roxagent sudo systemctl is-active roxagent-serve.service sudo journalctl -u roxagent-serve.service --no-pager -n 20command -vshould print/usr/local/bin/roxagent.roxagent-servemust beactive(this is pull mode: the agent listens on VSOCK port 818 so Sensor can request inventory). The journal should show the serve unit starting and an initial package scan. A warning about RPM epoch matching is expected and can be safely ignored. -
In ACS Central, open Vulnerability Management > Results > Virtual Machines.
You should see the
rhel9-vmworkload listed for therhacs-virtnamespace, including CVE counts by severity.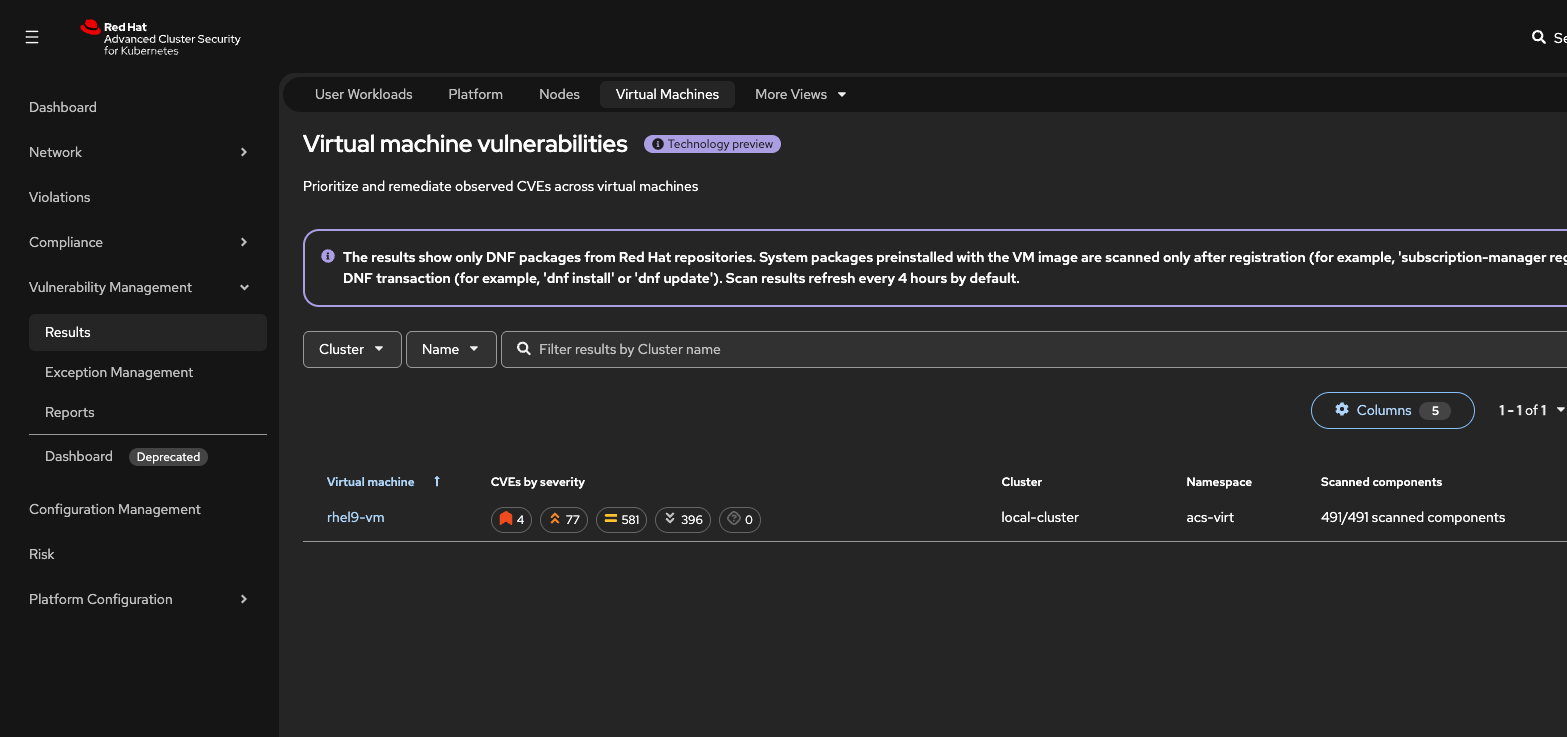
-
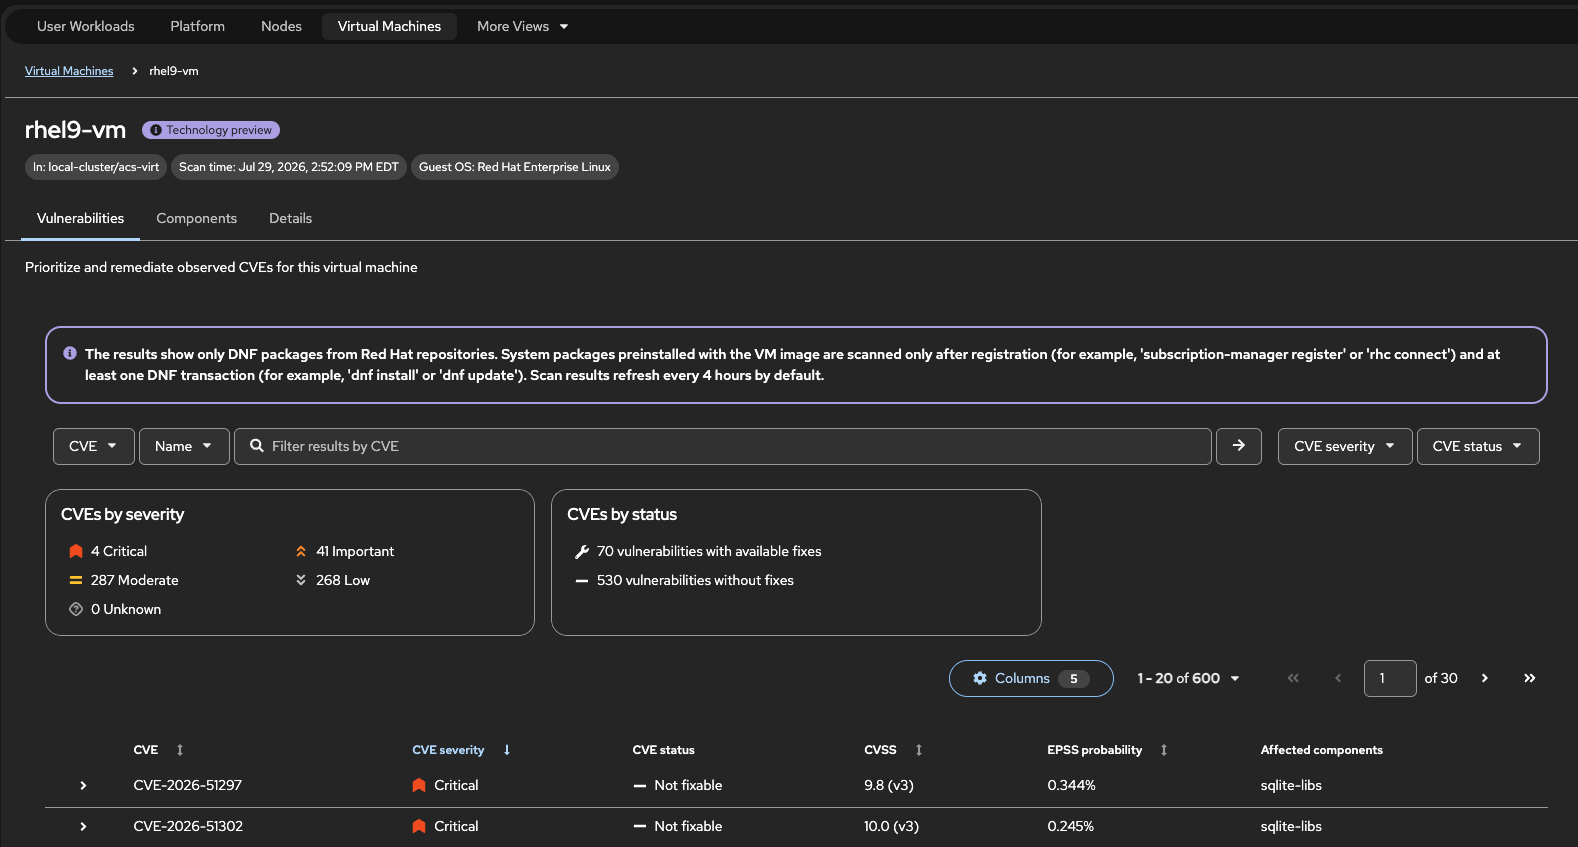
Click
rhel9-vmand review the reported CVEs and related details.Use the Vulnerabilities, Components, and Details tabs to explore findings for the guest OS.
-
Do you like what you see?
-
What would you like to see improved?
-
What workflows would you like to see supported?
-
Create and onboard a second VM (Optional)
In this optional path you deploy a second VirtualMachine from a declarative GitOps-style manifest, then confirm ACS scans it alongside rhel9-vm.
| Schedule the VM on a worker node. |
-
Sensor is already configured with
ROX_VIRTUAL_MACHINES_SCRAPER_POLL_INTERVAL=1mso a new VM appears in ACS shortly afterroxagentis listening (the product default can take about an hour). This only controls how often Sensor asks listening VMs for their current report; it does not change guest-side package rescans.If you need to confirm the setting:
oc set env deploy/sensor -n rhacs-operator --list | grep ROX_VIRTUAL_MACHINES -
Create the cloud-init Secret for the VM. This userdata:
-
Stores cloud-init config in a Secret
-
Registers the guest and enables RHEL 9.6 repos so ACS can map packages to CVEs
-
Installs extra packages (
java-17-openjdk,python3,php,postgresql,nodejs,git) so this VM reports a different CVE set thanrhel9-vm -
Installs
roxagentand starts it in server mode so Sensor can pull package inventory over VSOCKoc apply -f - <<'EOF' apiVersion: v1 kind: Secret metadata: name: rhel-webserver-cloudinit namespace: rhacs-virt type: Opaque stringData: userdata: | #cloud-config user: cloud-user password: redhat chpasswd: { expire: false } runcmd: - curl -k -o /tmp/katello-ca-consumer-latest.noarch.rpm https://demosat-ha.infra.demo.redhat.com/pub/katello-ca-consumer-latest.noarch.rpm - rpm -Uvh /tmp/katello-ca-consumer-latest.noarch.rpm - | subscription-manager register \ --activationkey="demosat-smt-lb1161-wolfgang" \ --org="Red_Hat_RHDP_Labs" \ --name="rhel-webserver" \ --force - subscription-manager release --set=9.6 - | subscription-manager repos \ --enable=rhel-9-for-x86_64-baseos-eus-rpms \ --enable=rhel-9-for-x86_64-appstream-eus-rpms - dnf clean all - dnf update -y - | dnf install -y \ httpd curl wget openssl openssl-libs zlib libxml2 \ ghostscript perl nginx tar gzip nmap-ncat bzip2 zip unzip \ freetype libjpeg-turbo libtiff libpng gnutls \ java-17-openjdk python3 python3-pip git php \ postgresql nodejs 2>/dev/null || true - | # Pull-mode binary must match the ACS Sensor on the cluster (4.12+). # The in-cluster roxagent-bin Service copies it from deploy/sensor. for i in $(seq 1 36); do curl -fsSL http://roxagent-bin.rhacs-virt.svc:8080/roxagent -o /usr/local/bin/roxagent && break sleep 5 done chmod 755 /usr/local/bin/roxagent restorecon -v /usr/local/bin/roxagent || true nohup /usr/local/bin/roxagent serve --port 818 --host-path / >/var/log/roxagent.log 2>&1 & - echo "Setup complete" EOF
-
-
Create the VirtualMachine. This manifest:
-
Enables VSOCK so ACS Sensor can pull index reports from
roxagent -
References the cloud-init Secret from the previous step
-
Boots the same primed RHEL 9 containerDisk as
rhel9-vm(quay.io/rhpds/ocp5-vm-primed:rhel9) so the guest starts without cloning a 30Gi DataSourceoc apply -f - <<'EOF' apiVersion: kubevirt.io/v1 kind: VirtualMachine metadata: name: rhel-webserver namespace: rhacs-virt labels: app: rhel-webserver spec: runStrategy: Always template: metadata: labels: kubevirt.io/domain: rhel-webserver kubevirt.io/size: small spec: domain: cpu: cores: 1 sockets: 1 threads: 1 devices: autoattachVSOCK: true disks: - bootOrder: 1 disk: bus: virtio name: rootdisk - disk: bus: virtio name: cloudinitdisk interfaces: - masquerade: {} model: virtio name: default rng: {} features: acpi: {} smm: enabled: true firmware: bootloader: efi: {} machine: type: pc-q35-rhel9.6.0 memory: guest: 2Gi nodeSelector: node-role.kubernetes.io/worker: "" networks: - name: default pod: {} terminationGracePeriodSeconds: 180 volumes: - name: rootdisk containerDisk: image: quay.io/rhpds/ocp5-vm-primed:rhel9 - name: cloudinitdisk cloudInitNoCloud: secretRef: name: rhel-webserver-cloudinit EOF
-
-
Wait until the VirtualMachineInstance is running. Cloud-init still registers the guest, updates packages, and installs
roxagentafter the VMI isRunning:oc wait --for=jsonpath='{.status.phase}'=Running vmi/rhel-webserver -n rhacs-virt --timeout=300sConfirm the VMI status and guest IP:
oc get vmi rhel-webserver -n rhacs-virtThe VMI should reach Runningwithin a couple of minutes. First-boot cloud-init (subscription, packages,roxagent) can still take several minutes after that. -
Optionally verify
roxagentinside the guest. Open the console (Virtualization > VirtualMachines > rhel-webserver > Console) and log in with the credentials from the cloud-init secret you applied above (username:cloud-user).command -v roxagent sudo grep 'index report containing' /var/log/roxagent.logA line such as
Sent message with index report containing 492 packages to hostmeans the agent already pushed inventory. The process does not have to still be running. -
Return to ACS Central → Vulnerability Management > Results > Virtual Machines and confirm
rhel-webserverappears alongsiderhel9-vm.With
ROX_VIRTUAL_MACHINES_SCRAPER_POLL_INTERVAL=1m, allow about one to two minutes afterroxagentis listening for Sensor to pull the first report and for results to show. Without that setting, first results can take up to an hour.
Exercise 2: File Activity Monitoring (FAM)
File Activity Monitoring watches file access, modification, and rename operations on paths you define, including wildcards, and can combine those events with process context. That gives runtime visibility that image scanning alone cannot provide, and it supports compliance controls such as PCI-DSS.
In this exercise you will confirm FAM is enabled, review the lab policies, and trigger a deployment-scoped violation.
Understanding the prerequisites for File Activity Monitoring (FAM)
Before you trigger a violation, review what RHACS requires for file activity monitoring. These conditions are already met in this lab.
For full product details, see the Configuring file activity monitoring topic in the RHACS 4.11 Operating guide.
- Collector (per node)
-
Observes file operations on monitored paths for containerized workloads and for host processes, then forwards events to Sensor.
- Sensor
-
Evaluates runtime policies against those events and reports matches to Central.
- Central
-
Stores violations and exposes them in the portal (deployment events) and API (including node events).
RHACS and the secured cluster must meet the following requirements:
-
File Activity Monitoring is enabled on the SecuredCluster under
spec.perNode.fileActivityMonitoring.mode: Enabled. -
Runtime policies use the File Path criterion (RHACS 4.11+ field) with either a Deployment or Node event source.
-
The architecture is x86 (currently the only architecture supported for FAM).
Node-event violations appear on the Violations page in the RHACS portal, and are also available through notifiers and the /v1/alerts API. Machine Config Operator file changes are not detected.
|
Review the preconfigured FAM policies
First, confirm FAM is enabled on the SecuredCluster:
oc get securedcluster -n rhacs-operator -o jsonpath='{.items[0].metadata.name}{"\n"}{.items[0].spec.perNode.fileActivityMonitoring.mode}{"\n"}'You should see the SecuredCluster name and Enabled.
With FAM enabled, this environment contains two SecurityPolicy resources deployed via GitOps:
-
Deployment File Activity —
eventSource: DEPLOYMENT_EVENT, monitors sensitive paths such as/etc/**/*,/boot/**/*, and/usr/**/*for container/workload file activity. -
Node File Activity —
eventSource: NODE_EVENT, monitors the same path patterns for host-level processes (SSH, systemd, and similar).
Review the policies in ACS Central:
-
In ACS Central, open Platform Configuration > Policy Management.
Search for
File Activityand open Deployment File Activity.Confirm:
-
Lifecycle is Runtime
-
Event source is Deployment
-
Policy criteria include File Path values such as
/etc/**/*
-
-
Open Node File Activity and confirm the event source is Node with the same style of File Path criteria.
The GitOps source for these policies is in the lab GitOps repository under rhacs-operator/instance/templates/fim-deployment-policy.yamlandfim-node-policy.yaml. -
Confirm the FAM trigger workload from Before You Begin is running:
oc get deploy,pods -n acs-fam-demoYou should see
fam-targetwith a pod inRunningphase.
Trigger and review a deployment FAM violation
-
Allow a root debug pod in
acs-fam-demo. New namespaces default to Pod Securityrestricted:latest, which rejectsoc debug --as-root(runAsUser=0). Label the namespace privileged and grant theprivilegedSCC to the default service account:oc label namespace acs-fam-demo \ pod-security.kubernetes.io/enforce=privileged \ pod-security.kubernetes.io/audit=privileged \ pod-security.kubernetes.io/warn=privileged \ security.openshift.io/scc.podSecurityLabelSync=false --overwrite oc adm policy add-scc-to-user privileged -z default -n acs-fam-demo -
Trigger a monitored file operation inside the FAM target.
oc debug --as-rootstill records as a deployment file-activity event for FAM:oc debug -n acs-fam-demo deploy/fam-target --as-root -- touch /etc/passwdThis matches the Deployment File Activity policy (
/etc/**/*under a deployment event source). -
In ACS Central, open Violations.
You should see the violation at the top of the page. Otherwise, filter by policy name
Deployment File Activity.Open a matching violation and review the runtime detail (file path, process context, deployment, and timestamp).
-
Optionally confirm the alert count via the ACS API (basic auth):
CENTRAL="https://central-reencrypt-stackrox.{openshift_cluster_ingress_domain}"
ACS_PASS=$(oc get secret central-admin-password -n rhacs-operator -o jsonpath='{.data.password}' | base64 -d)
curl -sk -u "admin:${ACS_PASS}" -G "${CENTRAL}/v1/alerts/summary/groups" \
  --data-urlencode 'query=Policy:"Deployment File Activity"' | jq .
You should see
numAlertsgreater than zero for that policy.- What you just proved
-
FAM on the secured cluster observed a container file operation on a monitored path, Sensor evaluated the Deployment File Activity runtime policy, and Central recorded a Violations-page alert.
Trigger a node FAM violation
Use this path if you want to exercise host-level file activity. Node FAM alerts appear on the Violations page in the RHACS portal, and are also available through the API and notifiers.
-
Trigger a host file operation via
nsenterinto PID 1 on a worker node:NODE=$(oc get nodes -l node-role.kubernetes.io/worker -o jsonpath='{.items[0].metadata.name}') echo "Using node: ${NODE}" oc debug "node/${NODE}" --quiet -- bash -c 'nsenter -t 1 -m -u -i -n -p touch /etc/passwd'Plain oc debug nodeshells are classified as deployment events. Thensenterinto PID 1 is required so RHACS records a NODE_EVENT. -
In ACS Central, open Violations. Select the Nodes tab, then you should see a recent node violation. The Deployments view does not list this policy. You can also query the alert count via the API:
CENTRAL="https://central-reencrypt-stackrox.{openshift_cluster_ingress_domain}"
ACS_PASS=$(oc get secret central-admin-password -n rhacs-operator -o jsonpath='{.data.password}' | base64 -d)
curl -sk -u "admin:${ACS_PASS}" -G "${CENTRAL}/v1/alerts/summary/groups" \
  --data-urlencode 'query=Policy:"Node File Activity"' | jq .
Node FAM alerts now appear on the Violations page, and remain available through the API and notifiers.
Exercise 3: ACS MCP Server
The ACS MCP server exposes Vulnerability Management and Configuration Management APIs as MCP tools. AI agents, including OpenShift Lightspeed, can query CVEs, images, deployments, nodes, and secured clusters in natural language instead of clicking through Central page by page.
In this exercise you will verify the preinstalled MCP endpoint and query ACS data through Lightspeed.
Understanding the ACS MCP server
The ACS MCP server is based on stackrox-mcp (same approach as the RHACS demo mcp-server-setup). It exposes RHACS Central data to MCP-compatible clients through toolsets such as:
-
Vulnerability management — query CVEs, images, deployments, and nodes (including
get_deployments_for_cveandget_nodes_for_cve) -
Configuration management — list secured clusters (read-only in this lab). There is no MCP tool for policies; review FAM and other policies in ACS Central as you did in Exercise 2.
- ACS MCP server
-
Runs in the
rhacs-mcpnamespace, speaks streamable HTTP MCP on/mcp, and calls Central on behalf of the client. - Authentication
-
External clients use passthrough auth: your MCP client sends
Authorization: Bearer <ACS API token>. OpenShift Lightspeed is pre-wired with an Analyst token via secretacs-mcp-api-token. - AI client
-
OpenShift Lightspeed (in-console) or an external MCP client (Claude Code, Cursor, Claude Desktop) discovers tools and answers natural-language security questions.
-
The ACS MCP server Deployment and Route are available in
rhacs-mcp. -
Central is reachable and the secured cluster is reporting data.
-
For Lightspeed: OLSConfig includes the
MCPServerfeature gate and anacs-mcpserver entry. -
For an external client: an ACS API token with at least the Analyst role.
Verify the preinstalled ACS MCP server
-
Confirm the MCP pod and Route:
oc get pods -n rhacs-mcp oc get route -n rhacs-mcp -
Check the health endpoint:
MCP_HOST=$(oc get route -n rhacs-mcp -o jsonpath='{.items[0].spec.host}')
echo "MCP endpoint: https://${MCP_HOST}/mcp"
curl -sk "https://${MCP_HOST}/health"
You should see
{"status":"ok"}.Keep the printed MCP endpoint URL — you will need it if you connect an external client. -
Confirm Lightspeed is wired to ACS MCP:
oc get olsconfig cluster -n openshift-lightspeed -o jsonpath='{range .spec.mcpServers[*]}{.name}{" -> "}{.url}{"\n"}{end}'
oc get secret acs-mcp-api-token -n openshift-lightspeed
You should see an
acs-mcpentry pointing at the in-cluster ACS MCP service URL, and the API token secret present.
Query ACS through OpenShift Lightspeed
-
Open the OpenShift console and launch OpenShift Lightspeed (chat icon).
If prompted to approve MCP tools, approve the ACS MCP tools so the agent can call them.
-
Ask Lightspeed to list secured clusters (warm-up, from the stackrox-mcp / RHACS demo examples):
List all clusters secured by ACS / StackRox. -
Ask a vulnerability question that exercises the vulnerability toolset:
Is CVE-2021-44228 (Log4Shell) detected in any of my clusters or deployments?This lab deploys intentionally vulnerable demo apps (including log4shell). Compare the agent answer with Vulnerability Management in ACS Central. -
Ask a multi-CVE question that should resolve deployments and namespaces for each CVE:
Are any of the following CVEs present in my clusters: CVE-2025-47151, CVE-2024-47561? Show which deployments and namespaces are affected by each.This prompt tests whether the agent can handle more than one CVE in a single request. -
Ask whether cluster nodes are affected (this should invoke
get_nodes_for_cve):Are any of my cluster nodes affected by CVE-2021-44228? -
Optionally try more targeted prompts. ACS MCP looks up named CVEs (and can filter by namespace). It does not enumerate every critical CVE in a namespace:
Which deployments in the log4shell namespace are affected by CVE-2021-44228?Use the ACS MCP server and run list_secured_clusters.- What you just proved
-
The ACS MCP server translated natural-language questions into RHACS API tool calls (secured clusters, CVE lookups for deployments and nodes), and Lightspeed returned security data without you running
roxctlor clicking through every Central page manually.
Connect an external MCP client (Optional)
Use this path if you want to connect Claude Code, Cursor, or Claude Desktop the way the RHACS demo documents.
-
Generate an Analyst API token in Central:
CENTRAL="https://central-reencrypt-stackrox.{openshift_cluster_ingress_domain}"
ACS_PASS=$(oc get secret central-admin-password -n rhacs-operator -o jsonpath='{.data.password}' | base64 -d)
curl -sk -u "admin:${ACS_PASS}" \
  -X POST "${CENTRAL}/v1/apitokens/generate" \
  -H "Content-Type: application/json" \
  -d '{"name":"acs-mcp-lab","roles":["Analyst"]}' | jq -r .token
Copy the token value. You can also create a token in ACS Central under Platform Configuration > Integrations > API Token.
-
Note the public MCP endpoint:
echo "https://$(oc get route -n rhacs-mcp -o jsonpath='{.items[0].spec.host}')/mcp" -
Configure Claude Code:
claude mcp add --transport http acs \ https://<acs-mcp-route-host>/mcp \ --header "Authorization: Bearer <paste-your-token-here>" -
Or add this to Claude Desktop / Cursor MCP settings:
{
  "mcpServers": {
    "acs": {
      "url": "https://<acs-mcp-route-host>/mcp",
      "headers": {
        "Authorization": "Bearer <paste-your-token-here>"
      }
    }
  }
}
Replace
<acs-mcp-route-host>and<paste-your-token-here>with the values from the previous steps. -
In your external client, run the same prompts as in the Lightspeed section (list clusters, Log4Shell CVE, multi-CVE deployments, node CVE) and confirm tools are invoked successfully.
Exercise 4: Init Container Security Coverage
This exercise will walk you through and demonstrate the capabilities in OCP5 and RHACS (5) for the scanning of Init Containers.
Init Containers are standalone containers executed as part of a Kubernetes deployment. They occur before the actual Pods of the deployment are created, and are used to perform various initialisation tasks needed by the Pod, namely operations like file initialisation, DB population and the like.
As such they are an attack vector for exploitation; RHACS now has capabilities for scanning and acting upon exploits.
Unlike Pods, Init Containers are not resident; once executed they are removed, so the runtime policies offered by RHACS focus on process execution and baseline comparisons.
For this exercise we will be using the built-in terminal on the right, the OCP console, and the RHACS interface.
Preparing the tests
In the OpenShift Lightspeed dialog, enter the following:
create a new project for me called rhacs-init-container-testThe MCP server requires approval, so approve when it asks you.
On the left hand navigation, choose 'Projects' and then rhacs-init-container-test. All of the examples will be executed in this project to allow you to observe the results simply in the ACS console.
In the built-in terminal on the right, run:
oc project rhacs-init-container-testCheck the project has no workloads using:
oc get podsEnabling Privileged access for the tests
In the terminal, run:
oc adm policy add-scc-to-user privileged system:serviceaccount:rhacs-init-container-test:defaultThis allows Pods, and Init Containers, to switch to Privileged to perform actions.
Running the tests
For the sake of testing we have four specific use-cases represented by different Deployment definitions, each designed to highlight a behaviour now offered within RHACS for the monitoring and actioning of Init Containers. These are:
-
'Clean' deployment - runs an Init Container that has nothing out of the ordinary in it
-
'Dirty' deployment - runs an Init Container that does something that is a violation
-
'Blue' deployment - runs an Init Container that performs a Privileged action that has justification
-
'Red' deployment - runs an Init Container that uses an unpatched Image with known CVEs and performs a Privileged action that has no justification
In the terminal, run:
git clone https://github.com/redhat-ads-tech/ea5-components ~/ea5-componentsIn the terminal, run:
cd ~/ea5-componentsWe will now apply two additional policies specific to this namespace only; in the terminal, run:
oc create -f ~/ea5-components/fixable-important-cve.yaml
oc create -f ~/ea5-components/privileged-init-container.yaml
While in the terminal, have a look at these two policy definitions. Specifically, for privileged-init-container.yaml note:
  policyName: "EAP-Init-Test: Privileged Container (Blue/Red)"
  description: "Demo policy for the RHACS 5.0 EAP init-container test workflow. Fires on any privileged container - main or init - inside the rhacs-init-container-test namespace. Used to validate that Build/Deploy policy evaluation reaches init containers (Blue = legitimate/noise, Red = illegitimate/true-positive)."
  rationale: "Containers running as privileged represent greater post-exploitation risk by allowing an attacker to access all host devices, run a daemon in the container, etc."
  remediation: "Verify that privileged capabilities are actually required (e.g. sysctl tuning) and cannot be provided via a narrower capability grant."
And for fixable-important-cve.yaml:
  policyName: "EAP-Init-Test: Fixable Important+ CVE (Dirty/Red)"
  description: "Demo policy for the RHACS 5.0 EAP init-container test workflow. Fires when any container image - main or init - in the rhacs-init-container-test namespace has a fixable CVE with CVSS >= 7. Used to validate that image vulnerability scanning/policy evaluation attributes findings to init containers (Dirty and Red should match; Clean and Blue should not)."
  rationale: "Fixable vulnerabilities above this severity threshold represent real, addressable risk and should not be shipped in any container, including init containers."
  remediation: "Rebuild the image against an updated base to pick up the available fix."
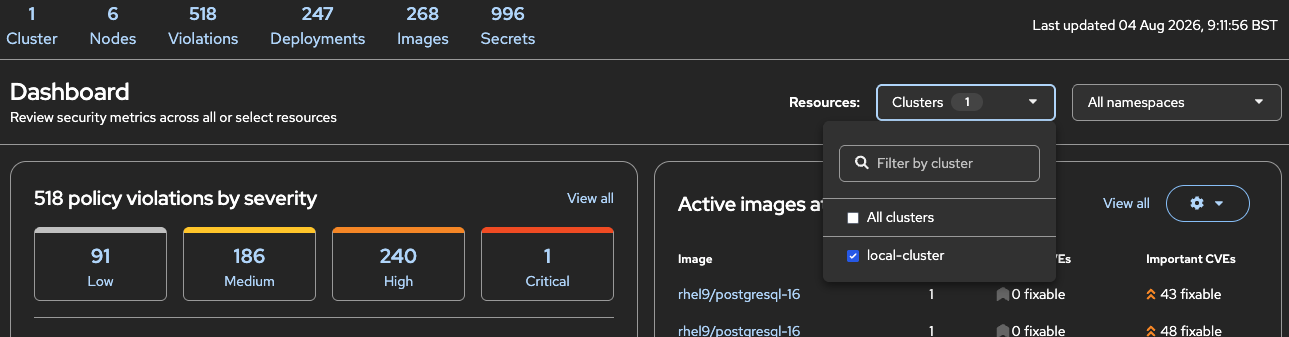
Switch to the RHACS console; select the resources pulldown and click on 'local-cluster' as shown below:
Now click on 'All Namespaces' and select 'rhacs-init-container-test'. There should be no violations (we have no workloads yet).
In the terminal, run:
oc create -f ~/ea5-components/clean-deployment.yaml|
This will create a deployment with a single Pod, which also executes an init-container. The init-container performs no dangerous actions (hence clean) |
Switch to the RHACS console. Make sure the 'Resources' is set to 'local-cluster', and select 'rhacs-init-container-test' in the Namespace pulldown.
You should see the dashboard which shows 1 low policy violation; if you examine the 'Active images at most risk' you will see two images displayed. Note that one of the images is 'distroless/base-debian12'.
Switch to the 'Violations' content page. This is a more concise summary of issues, and can be used interchangeably with the Dashboard, based on your preferences.
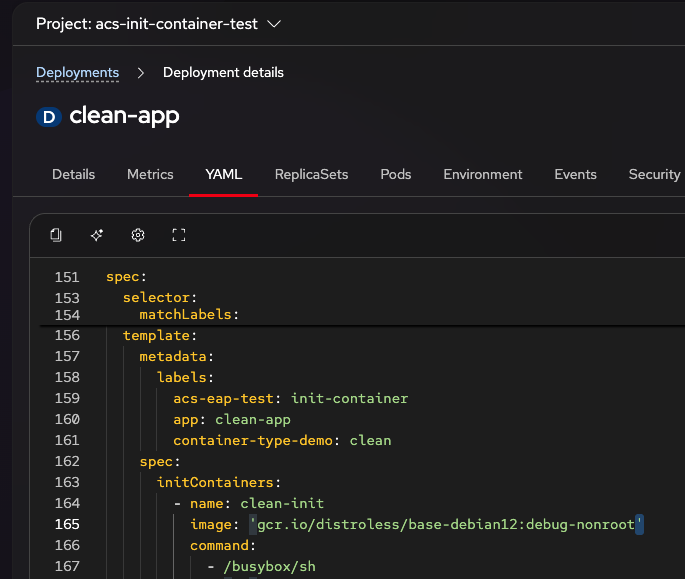
Switch back to the OpenShift interface. Click on Workloads and then Deployments. Click on the clean-app deployment. Click on Yaml.
Note the definition of the init-container; RHACS has detected and scanned this init-container correctly, and found no issues.
In the terminal, run:
oc create -f ~/ea5-components/dirty-deployment.yamlOnce the Application has deployed, click on Workloads and Topology. Click on the dirty-app roundel, then click on the Pod name displayed in the right-hand content window.
In the Pod content panel, click on Logs, then click on the pulldown for the Containers; select dirty-init
|
Pods can contain more than one Container, and the pulldown allows you to examine the logs of the individual containers, including, where used, the init-container |
The log will indicate that the init-container is well-behaved, but it based on image with known CVEs.
Switch to the RHACS console; you should still be on the Dashboard, with the namespace rhacs-init-container-test selected. Refresh the page.
|
The RHACS Dashboard is time-stamped and does not auto-refresh. |
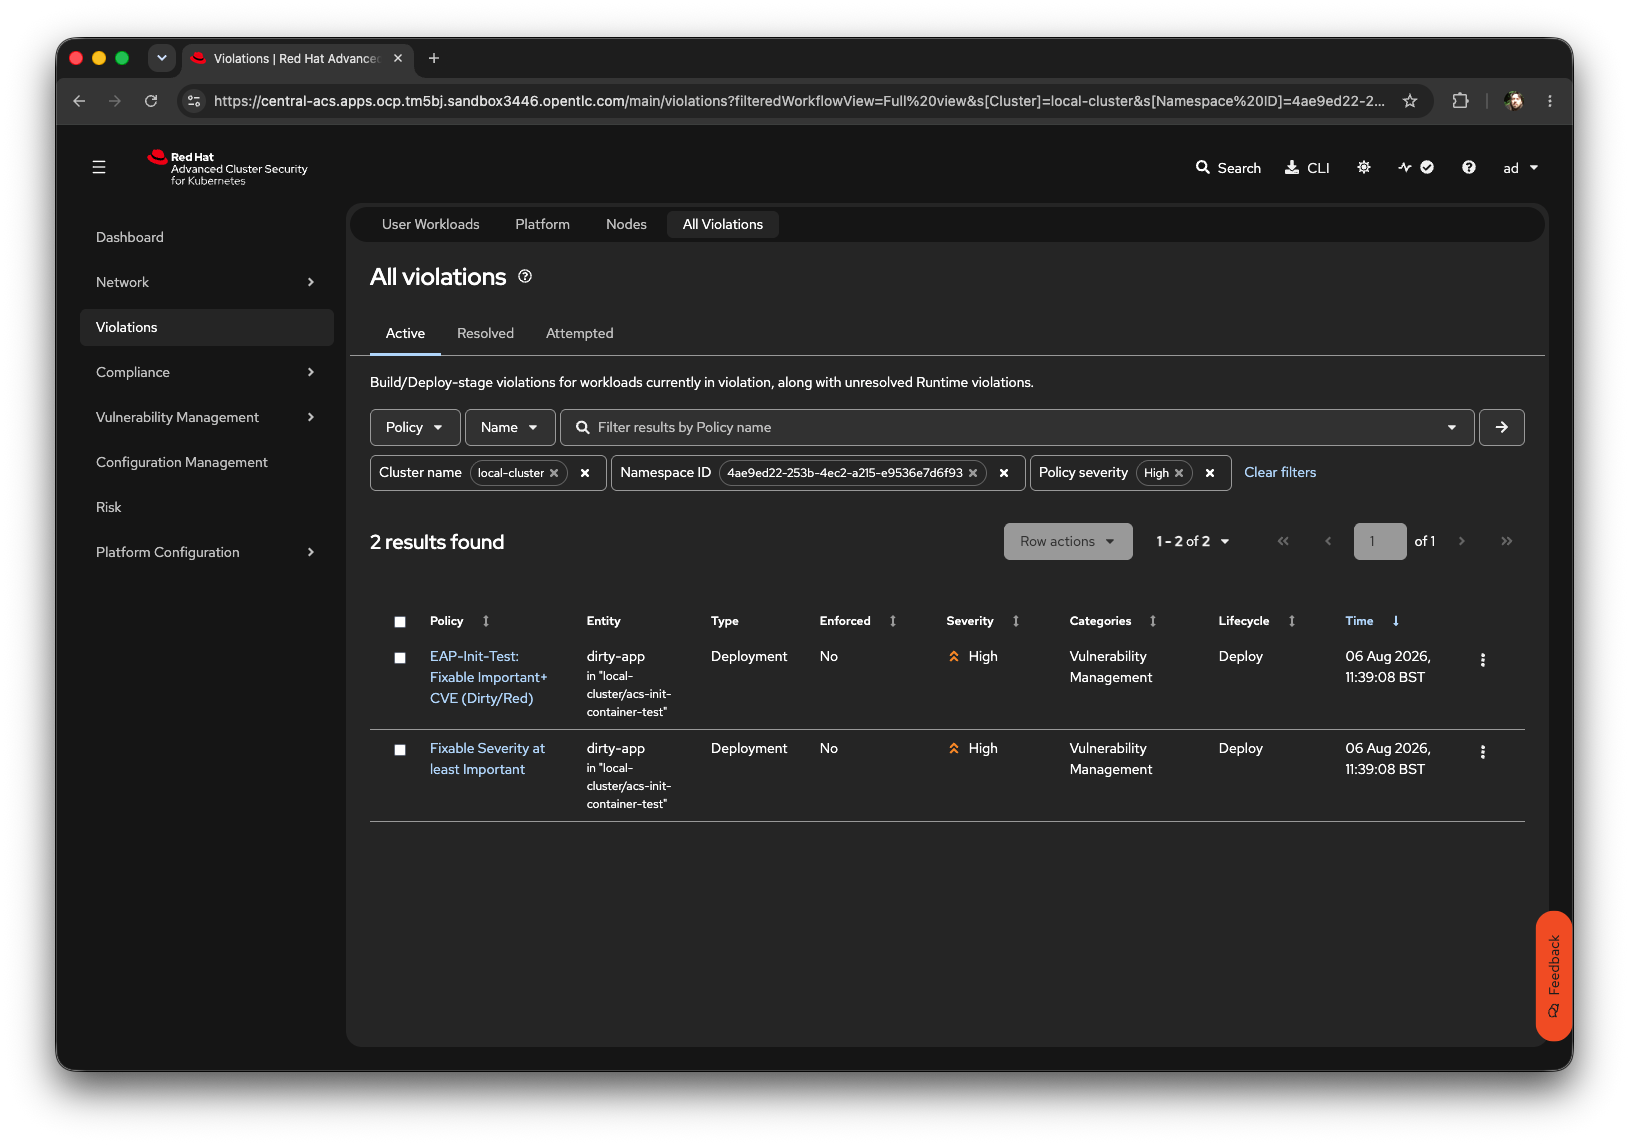
You will now see that RHACS has scanned the init-container as part of the deployment process, and discovered two High violations. Click directly on the 'High' panel.
The following overview specific to the violation detections in the init-container of the deployment will be rendered:
|
RHACS has detected and reported on violations within the Image of the init-container as executed as part of the 'dirty' deployment correctly |
In the terminal, run:
oc create -f ~/ea5-components/blue-deployment.yamlOnce this has succeeded, click on Workloads, Topology and make sure the Deployment has been successful (there will be a blue border around the blue-app roundel). As before, click on the blue-app Deployment, then the Pod name, and on the Pod content page examine the logs for the blue-init container (follow the instructions above to select the logs/appropriate container).
|
This example provides an init-container that switches to privileged and performs a legitimate action. |
Switch to the RHACS interface. Click on Dashboard (or Violations if you wish), select the local-cluster, and then the namespace rhacs-init-container-test as before.
|
RHACS has detected the behaviour of the blue deployment; there will be additional policy violations detected but also notice the level of the Risk Priority given in the Active images at most risk content pane. |
|
Blue triggered a privileged-policy with an operational justification. Now that init containers are include in policy evaluation, you may need to make changes to your security policies to exclude justified deviations. Experiment with the provided policies using the new Filters section and select "Skip init containers". Recall that the policy was applied as code. Local changes in the UI are good for experimenting and learning. You can use the "save as Custom Resource" to see the new policy code you would apply. |
The last scenario is to create a Deployment that behaves as with the blue deployment but performs a prohibited task. For this scenario we will add a specific policy and behaviour for our test namespace.
In the terminal, run:
oc create -f ~/ea5-components/red-deployment.yamlOnce the deployment has completed, click Workloads, Topology, then the roundel for red-app. Click on the running Pod, select the Logs content pane and examine the log output from the red-init container. It should read:
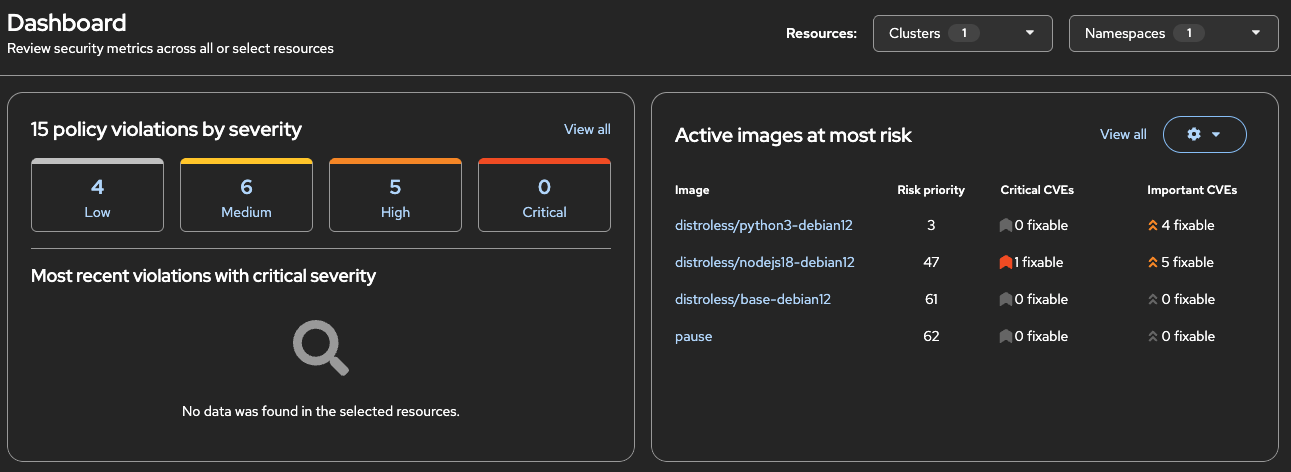
red-init: unpatched image with known CVEs, running privileged with no legitimate justificationSwitch to the RHACS console again. On the Dashboard, assuming you have selected local-cluster and the namespace rhacs-init-container-test you should now see this:
Selectively Skipping Init Container Evaluation
Organizations upgrading from ACS 4.x may want to preserve the previous behavior where init containers were not evaluated by certain policies. ACS provides a utility script that adds a "skip init containers" filter to existing policies, letting you selectively opt out of init container evaluation on a per-policy basis.
The script is interactive — for each eligible policy it prompts you to apply the skip filter, skip it, or apply to all remaining policies. It automatically skips policies that already have evaluation filters, build-only policies, declarative (CRD-managed) policies, and audit/node event policies.
The GA version of this script is available at stackrox/contributions. The version included in ea5-components has been modified to accept ACS 5 builds used in this lab environment, which may report a pre-5.0 version number.
|
Organizations using SecurityPolicy CRDs (policy-as-code) should instead manually add skipContainerTypes: ["INIT"] to the evaluationFilter specification in their manifests.
|
First, generate an API token and set the required environment variables:
CENTRAL="https://central-reencrypt-stackrox.{openshift_cluster_ingress_domain}"
ACS_PASS=$(oc get secret central-admin-password -n rhacs-operator -o jsonpath='{.data.password}' | base64 -d)
export ROX_API_TOKEN=$(curl -sk -u "admin:${ACS_PASS}" \
  -X POST "${CENTRAL}/v1/apitokens/generate" \
  -H "Content-Type: application/json" \
  -d '{"name":"skip-init-eval","roles":["Admin"]}' | jq -r .token)
export ROX_ENDPOINT="central-reencrypt-stackrox.{openshift_cluster_ingress_domain}:443"
Then run the script from the ea5-components directory you cloned earlier:
chmod +x ~/ea5-components/skip-init-container-evaluation.sh
~/ea5-components/skip-init-container-evaluation.sh
The script will list all eligible policies and prompt you for each one. Answer yes to add the skip filter, no to leave it unchanged, or all to update all remaining policies without further prompts.
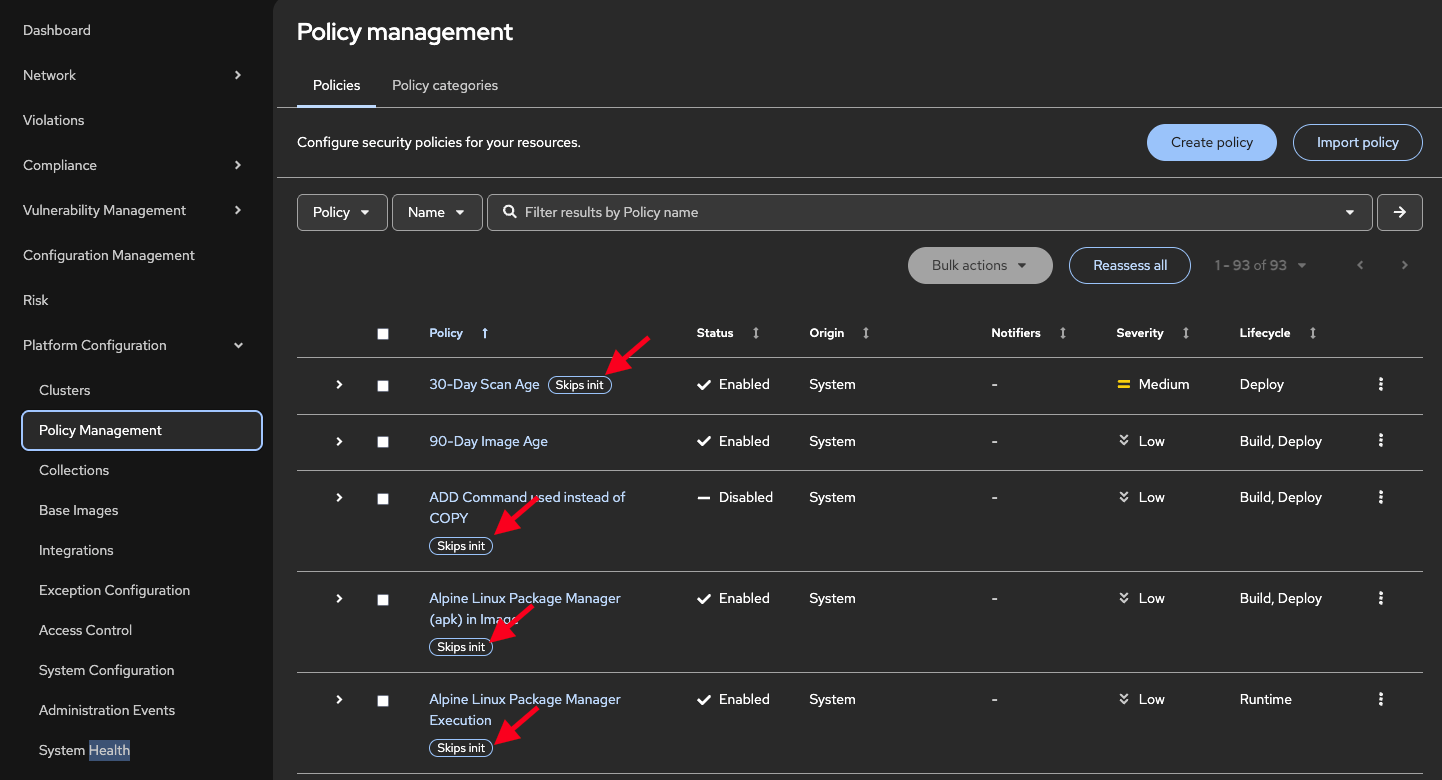
After running the script, navigate to the RHACS console and open Platform Configuration > Policy Management. Policies that were updated by the script will show a "Skips init" indicator next to them. Note that the declarative (CRD-managed) policies we applied earlier (EAP-Init-Test: Privileged Container and EAP-Init-Test: Fixable Important+ CVE) were explicitly skipped by the script — these must be managed separately by adding skipContainerTypes: ["INIT"] to the evaluationFilter in their CRD manifests.
Key Takeaways
-
ACS 5 extends security coverage beyond containers to virtual machines running on OpenShift Virtualization
-
roxagent listens over VSOCK for Sensor pull requests, requiring no guest network configuration for ACS scanning
-
File activity monitoring provides visibility into security-relevant file access patterns
-
The ACS MCP server enables AI agents to query secured clusters and CVE findings (deployments and nodes) programmatically
-
Init container scanning extends image and policy coverage to init containers